Friday, March 11, 2022
Fix USB port on Wacom Intuos 5 - PTH850
If your Wacom Intuos 5 tablet is not or intermittently recognized, this is likely due to a failing solder of the USB port on the tablet motherboard.
You can open it by removing the screws and then pop it open with a flat metal tool to release each hinges. You might break some but it should be fine...
You need to assess the damage first. Check on the type of crack and the type of the soldering problem you have before doing anything. You may be able to resolder the mini USB port.
If you can't you can cut off the head of the USB cord, keep the USB A part and stripped each of the four wires of
their casings so that you have some pure metal wire to work with.
The USB port on is Wacom Intuos 5 - PTH850 is mini USB B. This is the wiring:

You can then solder the wired directly to the TVS (transient voltage suppressor). Like this:

Then plug it to a computer check that you have 5V between Vcc and Ground. Then from the back of the TVS and the Ground. If not you can bypass the TVS.
Then you can us some epoxy to hold the cables together and dig a hole in the back cover so that it will allow the cable to pass when you reassemble the two parts together.
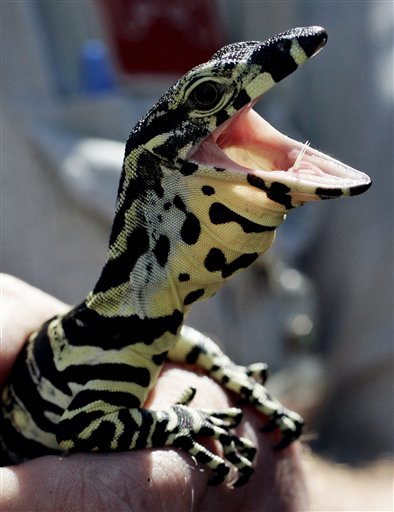
Here is a photo of the final work:

Hope it will save your 600$ tablet. Especially in this new era of expensive electronics..gwq
Monday, February 05, 2018
Quick and dirty fixes to allow Prestashop 1.7 to work in Debug mode on PHP 7.2
If you really need a quick and dirty fixes to allow Prestashop 1.7 to work in Debug mode on PHP 7.2, here it goes.
1) For the "Declaration of ControllerCore::setMedia() must be compatible with AdminControllerCore" error, check the admin controllers and modify the setMedia() to setMedia($isNewTheme = false)
Also the viewAccess() to viewAccess($disable = false)
2) For "Warning: count(): XXX must be an array or an object that implements Countable" add a empty() test on the array before the count.
Example in classes/Cart.php:
!empty($product_list) && count($product_list)
3) For "The each() function is deprecated.", replace "kv = each($mixed)" by
$kv = [$key, $mixed];
on vendor/prestashop/smarty/sysplugins/smarty_internal_compilebase.php
check the $kv['key'] before testing if the key is in the array
Like this:
$kv = [$key, $mixed];
// option flag?
if (isset($kv['key']) && in_array($kv['key'], $this->option_flags)) {
Hope it will help someone...
Saturday, September 02, 2017
Install Dash node from sources on Centos 6
As root:
cat /etc/centos-release
CentOS release 6.9 (Final)
yum -y install wget
yum update -y && reboot
yum groupinstall 'Development Tools'
yum install pkgconfig
rpm --import http://linuxsoft.cern.ch/cern/slc6X/x86_64/RPM-GPG-KEY-cern
wget -O /etc/yum.repos.d/slc6-devtoolset.repo http://linuxsoft.cern.ch/cern/devtoolset/slc6-devtoolset.repo
yum install devtoolset-2-gcc devtoolset-2-binutils devtoolset-2-gcc-c++
Install Berkeley DB
wget http://download.oracle.com/berkeley-db/db-4.8.30.NC.tar.gz
tar -xzvf db-4.8.30.NC.tar.gz
cd ./db-4.8.30.NC
cd build_unix
../dist/configure --prefix=/usr --enable-compat185 --enable-dbm --disable-static --enable-cxx
make
make install
Install ZeroMQ (from sources)
wget https://archive.org/download/zeromq_4.1.4/zeromq-4.1.4.tar.gz
tar xzvf zeromq-4.0.3.tar.gz
cd zeromq-4.0.3
./configure
make
make install
yum install boost boost-doc
wget http://repo.enetres.net/enetres.repo -O /etc/yum.repos.d/enetres.repo
yum install boost-devel
yum install openssl openssl-devel
wget ftp://mirror.switch.ch/pool/4/mirror/centos/6.9/os/x86_64/Packages/libevent2-devel-2.0.21-2.el6.x86_64.rpm
yum install libevent2-devel
useradd dash
passwd dash
Login as dash:
mkdir dashcore
cd dashcore
git clone https://github.com/dashpay/dash -b v0.12.2.x
cd dash
add m4_pattern_allow(PKG_CONFIG_LIBDIR) to configure.ac
./autogen.sh
source scl_source enable devtoolset-2
export PKG_CONFIG_PATH=/usr/lib/pkgconfig/ (for ZeroMQ lib)
./configure
you need to make sure you have more than 5Go free RAM
make
Prestashop ERROR Message "You already have the maximum quantity available for this product"
When adding a product to cart on front-end, you have this error message in the POST RESPONSE:
"You already have the maximum quantity available for this product"This could come from many different reasons but one of them could that your MySQL database is in force recovery mode.
You may also encounter the following error in phpmyadmin when trying to import data:
Operation not allowed when innodb_forced_recovery > 0.So find your my.cnf configuration file (on osx it's in /opt/local/etc/mysql56/my.cnf) and comment out following line
# innodb_force_recovery = 1
Then restart your database.Example on osx:
launchctl unload -w /Library/LaunchDaemons/org.macports.mysql56-server.plist
launchctl load -w /Library/LaunchDaemons/org.macports.mysql56-server.plist
Tuesday, June 28, 2016
Back to TP-LINK stock firmware
If you are trying to go back to the stock firmware using the mtd command and you have the following error message:
If you don’t upload a proper firmware, your router will get bricked next time it boots.
You need to strip the first 257 bytes from the .bin.
Then you're good to upload the new tplink.bin:
And visit the default url:
.. [e]Failed to erase blockIf you don’t upload a proper firmware, your router will get bricked next time it boots.
You need to strip the first 257 bytes from the .bin.
#dd if=Archer_c7-firm-orig.bin of=tplink.bin skip=257 bs=512Then you're good to upload the new tplink.bin:
#mtd -r write /tmp/tplink.bin firmwareAnd visit the default url:
http://192.168.0.1 Monday, June 06, 2016
Latching relay (Hager EPS410B) with push buttons (Legrand Niloe)
Here you go:
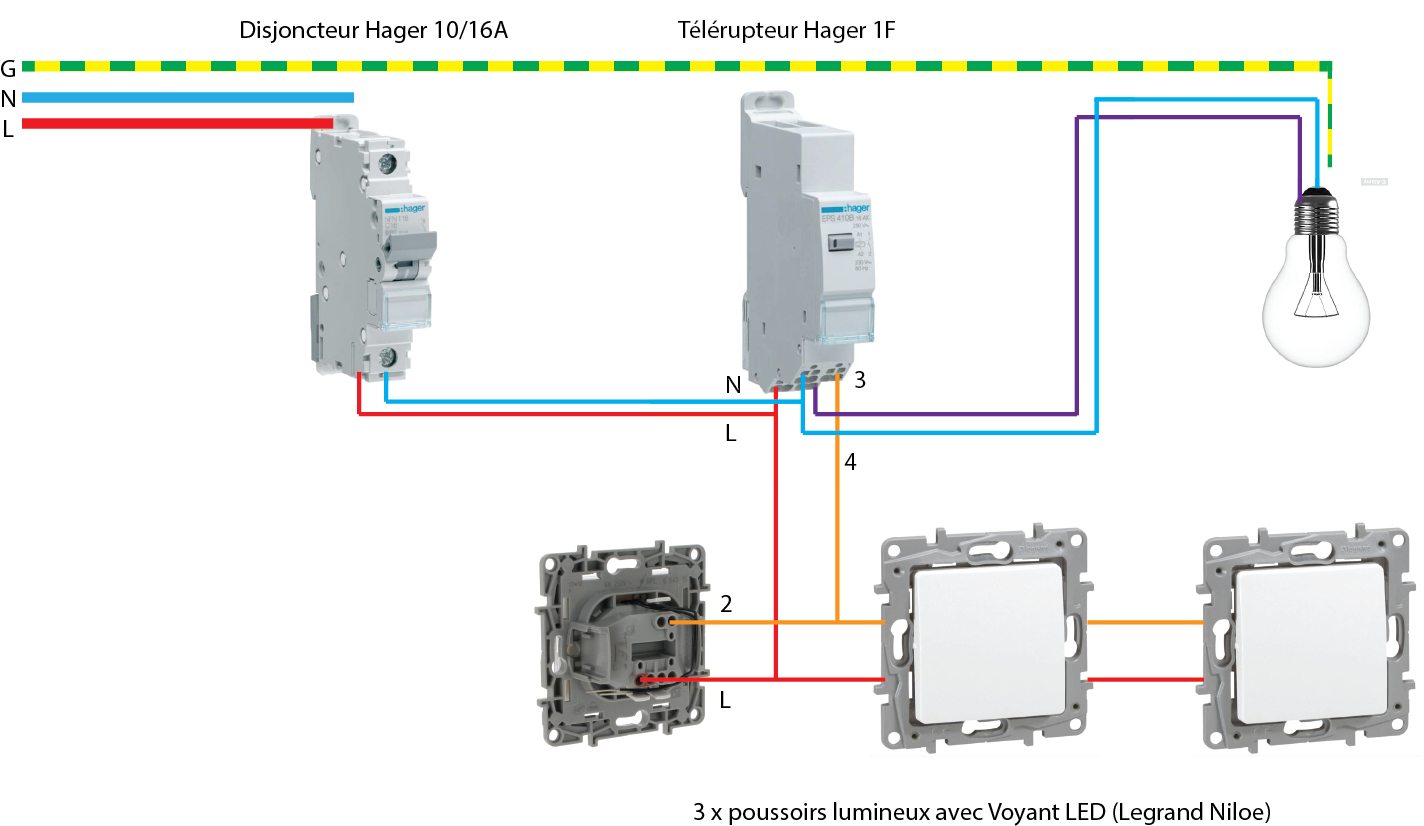
Basically the 2 from the push button switch goes to the 3 of the relay and the 4 goes to the light(s), the rest is pretty straight forward.
Basically the 2 from the push button switch goes to the 3 of the relay and the 4 goes to the light(s), the rest is pretty straight forward.
Thursday, May 19, 2016
Extract pictures from a mbs/mbox export
If you're using a mail client that can export its mails to a mbs or mbox format; like Opera or Thunderbird; and you want to parse these mails; for example to extract all pictures or any other operation, you can follow this approach using a formail and PHP.
Firstly you'll need to split the mbox archive to separate all the email as we'll use PHP to parse it and you're going to explode all the memory and timeout settings if you parse it in one go.
The command to do that is:
#cat Inbox.mbs | formail -ds sh -c 'cat > extra/msg.$FILENO'
This will generate a separate file for each email (msg.XXX) in a separate directory (extra).
Then you can use PHP and the mime_parser class (download it here mime_parser.php, rfc822_addresses.php.html ) to iterate other all these files and extract the picture (or other attachments).
In these case I'm using the message content to extract information about the pictures, to rename them as they all have the same name and save them in a separate folder (extracted).
Firstly you'll need to split the mbox archive to separate all the email as we'll use PHP to parse it and you're going to explode all the memory and timeout settings if you parse it in one go.
The command to do that is:
#cat Inbox.mbs | formail -ds sh -c 'cat > extra/msg.$FILENO'
This will generate a separate file for each email (msg.XXX) in a separate directory (extra).
Then you can use PHP and the mime_parser class (download it here mime_parser.php, rfc822_addresses.php.html ) to iterate other all these files and extract the picture (or other attachments).
// get the mails in separated files with
//cat Inbox.mbs | formail -ds sh -c 'cat > extra/msg.$FILENO'
require_once('mime_parser.php');
require_once('rfc822_addresses.php');
$mail_dirs = array("extra");
function dirToArray($dir)
{
$result = array();
$cdir = scandir($dir);
foreach ($cdir as $key => $value)
{
if (!in_array($value,array(".","..",".DS_Store")))
{
if (is_dir($dir . DIRECTORY_SEPARATOR . $value))
{
$result[$value] = dirToArray($dir . DIRECTORY_SEPARATOR . $value);
}
else
{
$result[] = $value;
}
}
}
return $result;
}
$mime=new mime_parser_class;
$mime->ignore_syntax_errors = 1;
foreach($mail_dirs as $mail_dir)
{
$files = dirToArray($mail_dir);
//print_r($files);
foreach($files as $file)
{
echo "doing:". $mail_dir.'/'.$file . "\n";
$fd = fopen($mail_dir.'/'.$file, "r");
$email = "";
while (!feof($fd))
{
$email .= fread($fd, 1024);
}
fclose($fd);
$parameters=array('Data'=>$email);
$mime->Decode($parameters, $decoded);
//print_r($decoded);
$file_name = "";
foreach($decoded[0]['Parts'] as $part)
{
//EVENT TIME: 2015-12-15,08:18:40
//print_r($part);
if(preg_match('/text\/plain/', $part['Headers']['content-type:']))
{
echo "TEXT\n";
preg_match('/EVENT TIME: (.+)\n/', $part['Body'], $matches);
print_r($matches);
//$file_name = mb_ereg_replace("([^\w\s\d\-_~,;\[\]\(\).])", '', $matches[1]);
$file_name = mb_ereg_replace(":", '-', $matches[1]);
$file_name = mb_ereg_replace(",", '_', $file_name);
echo $file_name . "\n";
}
if(preg_match('/image\/jpeg/', $part['Headers']['content-type:']))
{
echo "IMAGE\n";
preg_match('/(.)\.jpg/', $part['FileName'], $matches);
print_r($matches);
file_put_contents('extracted/'.$file_name.'_'.$matches[1].'.jpg', $part['Body']);
}
}
}
}
echo "ALL END\n";
?>
In these case I'm using the message content to extract information about the pictures, to rename them as they all have the same name and save them in a separate folder (extracted).
Sunday, January 10, 2016
Flash a Galaxy Note 3 with CyanogenMod
-
Root your device, first try the kingoapp app, here https://www.kingoapp.com/root-tutorials/how-to-root-galaxy-note3.htm. You'll need a Windows desktop. If this does not work go to
xda-developers.com, find your device and look under rooting. Alternatively use towel root app.
- Find your N9005 devices codename, not the model number. You're likely to be good using Unified (htlte). It worked with a n9005ZHUENH4.
- Install a recovery, get the rashr app from google play, select
your devices codename and choose which recovery you want, I recommend TWRP
-
Download CM, go to https://download.cyanogenmod.org/. Select your codename, then click the build you want, for 5.0 Lollipop, its
cm 12 , and for KitKat cm 11. https://download.cyanogenmod.org/?device=hlte&type=snapshot
- Download essential Google apps here http://forum.xda-developers.com/android/software/reborn-gapps-t3074533 and decide which package you want (full, mini, micro, nano).
- Store CM and gapps zips somewhere you can remember in sdcard.
-
Reboot to recovery (hold home + volume up buttons).
Backup, select backup and follow the instructions to confirm.
- Wipe, select wipe and follow the instructions to confirm.
- Flash CM, select install, select zip from sdcard, find the cm zip and follow the instructions to confirm.
- Flash gapps, select install, select zip from sdcard, find the gapps zip and follow the instructions to confirm.
- Reboot.
- Voila!
![]()